We just switched to a top entry cat litter box to reduce the litter mess on the floor. Here is how we did it for under $5! Watch the video HERE!
Author Archives: scrimplythrifty
Homemade Chocolate Milk Mix Recipe

Don’t ya just get tired of buying processed chocolate milk mixes that contain HFCS, lots of sugar, soy and other unhealthy substances? Me too! I feel guilty every time I give it to my kids, yet I can’t deny them a nice cold glass of creamy, chocolaty, goodness. So today I thought I might try something new, something that has been floating around in the back of my mind for a while now. Cocoa Powder.
The problem with cocoa powder is that it doesn’t blend with milk like the name-brand powder stuff does…which is why we end up buying it, right? So that was a problem I needed to solve. I have made hot chocolate before using cocoa powder, sugar, milk and vanilla, heated on the stovetop (which is wonderful and I highly recommend it) but I really didn’t want to get into all that heating and cooling for cold chocolate milk. So the first thing I tried was putting two or three tablespoons of milk in a glass and heating it in the microwave until hot. Then two tsp of cocoa and two servings of stevia (I currently use Kal brand). It did turn out good and was approved by the kids but they were unhappy with the cocoa powder gunk that settled at the bottom of the glass.
Let me just interject here with a plug for stevia. I quit using sugar in drinks about 3 or 4 years ago. For the longest time I used a brand of stevia in little packets with maltodextrin in it. I have since found that maltodextrin is not very healthy. I have tried a few different brands (Sweet Leaf and Kal) in the really potent form as well as liquids and just about every packet out there. I don’t recommend the packets, most have an awful aftertaste and have other things mixed in with them. As far as the potent powders (1/40th tsp= 1 tsp sugar) Sweet Leaf was hard to measure but otherwise good. Kal comes with a super tiny spoon to measure it. They both blend well in my coffee and tea, and the flavor is good. Now that I have the spoon from the Kal brand I will probably buy either. The liquid brand is good, some brands though take a lot to sweeten anything. I have found that when you start using stevia it has a bit of an aftertaste, especially with certain brands, but once you get used to it you don’t even notice it. Stevia is a healthy and natural alternative to sugar and if you haven’t tried it, I highly recommend it. You can read up on the health benefits of stevia here.
Ok, I’m done with my stevia “commercial”. Thanks for listening. :0)
So here’s the recipe and directions that I settled on.
HOMEMADE COLD CHOCOLATE MILK
1 cup milk
2-3 tsp cocoa
1 1/2 servings stevia or 2 tsp sugar (more or less to taste)
Put the milk in a blender. I prefer to use the magic bullet since it’s compact and easy to clean up—and you can even drink right out of the cup. :0) add the cocoa and sweetener of choice. Blend well. This will incorporate the powder with the milk enough that it doesn’t end up as a brown slurry at the bottom of the glass. I make a few servings at a time and put it in a container in the fridge. Just make sure you give it quick shake before serving.
For dark chocolate lovers, try the dark chocolate cocoa. I tried it too…yum!
This isn’t just healthy but saves a ton of money.
A container of powdered Nesquick is 38 servings and costs around $4.00. A container of cocoa powder (8 oz.) is anywhere from 45-67 servings (depending on whether you use 2 or 3 tsp per 8 oz. of milk) and if you use the concentrated stevia, even though it costs around $15.00 on average, it lasts forever, so it will be no more than $1.00 to sweeten those 65 servings.
Here’s the breakdown:
NESQUIK @ $5.00 – $6.00 for 38 servings = $.131 – $.157
HOMEMADE WITH HERSHEY’S @ $5.00 maximum for 67 servings = $.074
HOMEMADE W/ BAKER’S CORNER FROM ALDI @ approximately $2.50 for 67 servings = $.052 (I’m guessing on the price and I will try to remember to check next time I’m there.)
Note: Some blog reviews I saw did not recommend Aldi’s brand, I tasted little difference and I tried both back to back since I had both in the pantry, but if you have a discerning palate, you might want to stick with Hershey’s brand.
So, the health benefits plus the price = win-win!
Now if I could only find local raw-milk for (much) less than $10.00 a gallon I would be one happy mama!
How To Make Homemade Reusable Pop-up Baby Wipes
We all know how the little things add up, especially when we have a new little one in the house. Well, here is a great way to save about $40-$70 a year. And it’s really easy, especially if you are already using cloth diapers. Here’s what you will need;
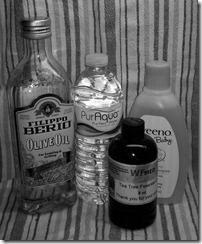
3 cups distilled water (hot)
3 tsp. baby soap
3 tsp. olive oil
5 drops of tea tree oil (antibacterial)
1 empty wipes “pop up” container
3-4 old cotton t-shirts
Cut your old t-shirts (I used three shirts in size XL) into squares (approx. 6 1/2” X 8 1/2”) An easy way to do this is to lay the t-shirt out flat, cut off the bottom band, then cut up each side to the armpit. Measure about 6 1/2” up and cut a strip across that width (through both layers). Cut that strip into three equal parts. Then measure 6 1/2” up and cut another strip, and cut that into three equal parts. Then take the remaining top part of the t-shirt and using one of your cut pieces measure out and cut two more squares. You will get 16 squares out of one t-shirt cutting this way. You may end up with more or less and may have to adjust your cuts according to the t-shirt size.
To stack the wipes, lay one down with the longer end going north and south, and the short ends east and west. Then lay another one down below it, overlapping the first wipe half way. Then fold the first wipe over the second wipe so it is folded in half. then place another wipe on top where the first wipe was and fold the second wipe in half over this, continue until you have a large stack of wipes, each one folded into the next. Place the wipes into the empty wipes container.
In a large bowl mix the water, olive oil, baby wash, and tea tree oil. Stir with a spoon until blended. Slowly pour the mixture over the wipes to saturate. Close the lid and your wipes are ready to use. If you are making more than enough for just a few days, I would suggest keeping the wipe solution in a jar in the fridge to help preserve it longer. When you run out, just add a stack of dry ‘t-shirt’ wipes and pour the solution over until saturated. Another way that this could be done is to put the dry wipes in the wipes box and the solution in a spray bottle, you can spray the wipe before using it or since these ingredients are safe for your baby’s skin, you can also spray right on his/her bottom.
To clean, throw the wipes right into the wash with your cloth diapers. Sometimes you might encounter such a mess that you don’t want to clean out the wipe, or put it in with the washables. On those occasions, I just toss it right in the trash. I would have just tossed the old t-shirts anyway. This way they are getting used multiple times and since they are 100% cotton, they are biodegradable when we do choose to throw them out. We are told that disposable diapers take over 500 years to decompose and I can’t come up with any good information on how long it takes wipes to biodegrade but would venture a guess that it’s a pretty long time. Most wet wipes are made using cotton with synthetics, and other chemicals, and then they add alcohol, perfumes and who knows what else. We know that they don’t decompose quickly or else they would be falling apart after sitting on the shelf for 6 months. A 100% cotton shirt takes 6 months to decompose and cloth diapers are reusable for many years to come. And since we are making them ourselves and know exactly what is going into them we don’t need to worry about things like THIS happening to our children.
And lastly, if you are not using cloth diapers, I would encourage you to find a cloth method that suits your needs and try it for a while. You will not only save a ton of money, but you will help save our precious God-given environment for our precious God-given kids.
If you have any additional wipes ideas that are thrifty or environmentally friendly (or both), or if you have a recipe that you use, please feel welcome to comment below and tell us what is working for you.
Easy Healthy Homemade Popcorn

My cousin and I were recently discussing an article we read called Seven Foods You Should Never Eat. One of the no-no’s was microwave popcorn. The article told about the toxic (possibly cancer causing) chemicals that are present in the lining of the bag. The article said that studies show that microwaving causes the chemicals to vaporize–and migrate into your popcorn. That’s enough right there to make me think twice about eating a bag of microwave popcorn. And I don’t know if you have ever looked at the ingredients in a bag of microwave popcorn, but I have, and you can believe me when I tell you how unhealthy they are. Hydrogenated oil is one of the ingredients that should always be a red flag. Hydrogenated oil has been chemically altered to make the oil more shelf stable. When hydrogenated oil is made they take the healthy, cholesterol lowering, unsaturated fats, and convert them to a fatty acid known as trans fat. These unhealthy fats are known to increase bad cholesterol and decrease good cholesterol. Talk about a serious artery clogger. If you see hydrogenated oil or partially hydrogenated oil on an ingredient list, and you will see it often, run (don’t walk) the other way (the exercise is good for you!).
So back on topic. Today I am going to show you how to make popcorn two different ways. Both easy, healthy, and in ScrimplyThrifty fashion…cheap!
DO IT YOURSELF MICROWAVE POPCORN
The first is easy microwave popcorn. You will need popcorn (the plain store brand popcorn that you can buy in a bag for a dollar or two will work just fine). You will also need plain brown lunch bags. 1 Tablespoon of butter (or oil) is optional. First Place about 1/3-1/4 cup of popcorn in the paper bag, then add the butter on top of the popcorn, if desired. You can opt to put it on after the popcorn is cooked, your choice. If you like the soppy buttery type popcorn, putting it on after is the way to go. Putting it in the bag just gives it a light buttery flavor, and a not-so-messy-to-eat popcorn. Ok, now just roll the bag a few times. I fold mine in a little on the corners to make sure it doesn’t open whilst popping. Place the bag on a plate (if butter is added) and microwave on high for 2-3 minutes. Just do like you do with store bought popcorn and listen closely. When the popping slows, it’s time to turn it off. Don’t strive to make sure every kernel is popped. Because we all know how unappealing burnt popcorn to everyone in the house…and maybe even your neighbors. he he! Be careful when you open it, steam burns! Dump it into a bowl, add your favorite toppings, shake it around a bit and there you have it! Yum!
EASY HOMEMADE STOVE TOP POPCORN
The second way to make popcorn is on the stove. This is also really easy, but not as easy as plopping it in a bag and nuking it! This recipe is for all of you die hard naturalists! I understand your plight, I really do, but sometimes it’s difficult to give up the convenience of just zapping stuff!
You will start with a basic three or four quart saucepan with a snug fitting lid. Heavy bottom pans are best. You will add 3 Tablespoons of oil (I prefer coconut oil- but any high smoke point oil will work just fine) and three kernels of popcorn. Heat pan on medium high heat. When two or three kernels in the pan pop, add 1/3 cup of popcorn into the oil in an even layer. Replace the lid, remove from heat, and count 30 seconds. This method brings the oil up to the right temperature as well as bringing all the kernels to a temperature where they will all be ready to pop at nearly the same time (leaving few kernels un-popped). Return the pan to the heat, and the popcorn will soon begin to pop, all at once! When this happens, tilt the lid only slightly to allow steam to escape, and gently shake the pan back and forth over the burner. when the popping slows down to 5-6 seconds between pops, remove the pan from the heat, pour it into a big bowl, and add butter and salt if desired. And there you have it! Easy homemade healthy popcorn that will cost you pennies,
Oils to try: Coconut, Corn Oil, Extra Virgin Olive Oil, or Bacon fat.
Flavorings/Toppings: Tabasco, Curry, Cumin, Chili pepper, Cayenne, or black pepper & grated parmesan cheese. Garlic butter & finely grated cheddar cheese.
I once perfected a recipe to make homemade kettle corn, but I don’t think I ever wrote down the recipe. It was so good that I couldn’t quit making it but finally I just had to stop! I’ll try it again one of these days and when I do, I’ll add it to this post. Beware though, If you do try it yourself, it is VERY addictive.
Happy popping everyone!
DIY Wool Diaper Soakers
I have been busy scouring the net for diapering ideas for the new baby (just four weeks to go). I have come across some stumbling blocks as far as size goes for a newborn and hate to make a bunch of diapers that aren’t going to fit him right away. Or for that matter, make too many that do and he will out grow them too quickly. I’m really interested in the One Size diapers but after making one, I’m still unsure if it’s going to fit a little skinny 7 or 8 pounder. So, I have decided to wait until the little one arrives so I will have a diaper model to try them out on.
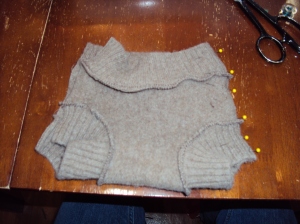
In the meantime I have discovered wool diaper soakers. I can use regular newborn prefold diapers and then use the soakers as a cover. Later on I can use the newborn prefolds as soakers in the diapers I am going to make. I had a few old (shrunken) wool sweaters lying around so I cut them up and tried a pattern I found on Katrina’s Sew Quick Soaker Pattern blog. I had looked at several others, but not one of them compared to this one. The other’s looked old-fashioned, even amateur, but this one is trendy and you can mix it up a little to make it your own style. The most important thing to me was that you can sew them up pretty quickly. I cut out the patterns one evening and whipped them up the next day. It took me a little while because I didn’t see any instructions other than a video tutorial, and to be honest, the video had me a little confused. Once I got the first two done, I had figured out an easy way to sew it up and it started going pretty quick. I also added in a ‘longie’ out of leftover sleeves, and I added fishie appliques, so that did take a bit of time too. Keep in mind that this is my first attempt at making any type of diaper soakers…other than the things you stuff in a pocket diaper…so flaws are to be expected. 😉
HINT: You can find used (often already felted-washed, dried, shrunken) wool sweaters at your local thrift stores. Just look on the tags for sheep’s wool, cashmere, angora, alpaca, or a mix of these types of wool. 100% is best, but I have used 80% wool and seems to work just fine. Some are softer than others, which is great for baby.
So, with no further ado, here is my little tute:
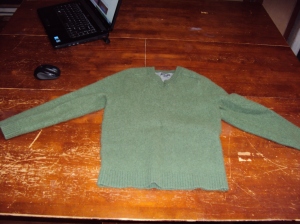
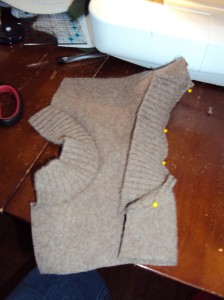
Start out with an old wool sweater. I prefered to felt mine (okay, okay, they were already ‘felted’) But I did want them felted, just because #1. To me it seems they wouldn’t be as leaky and #2. I would have ended up ‘felting’ them by accident later, I’m sure, and then would be too small. So, I just decided that, for me, felted wool is best.
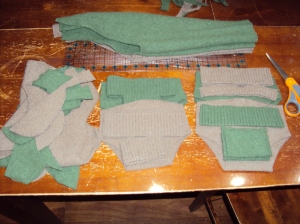
Trace the pattern onto the sweater and cut it out…while you ignore my fondness of sharpie markers that don’t wash out—hmm, here’s a thought, maybe I’ll try the kids washable markers next time. If it works, it will be the last time I ruin perfectly good fabric because I read the instructions wrong. Oh, my wandering mind…back on topic now…..
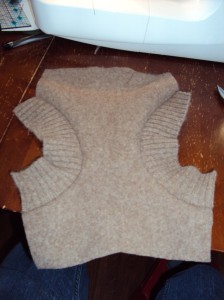
Ready to sew.
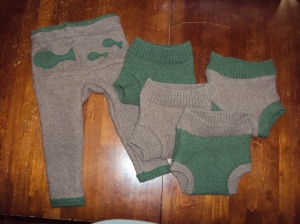
Here’s what I got out of two sweaters. 2 Newborn soakers, 2 size 1 soakers, and hopefully enough for a longie….we’ll see. With a bunch of scraps left over… nursing pads maybe?
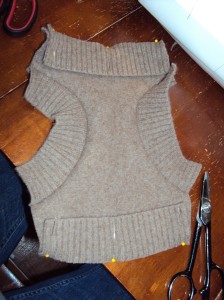
Sewing the leg cuffs. Line up the edge of the cuff material (the ribbed edges–cuffs, waist, collar— of the sweater works best for this. when I ran out I used strips of fabric and folded them in half for the cuffs which is a little harder when you are using a thick felted wool.) The actual cuff may be shorter than the fabric that you are sewing it onto. The best way to make it fit is to pin the end of the cuff to the starting point where you will sew it to, then pin the other end of the cuff to the other side, where you will stop sewing. Fold it in half with the shorter fabric in the middle and pin right in the middle, then place a few more pins just to make sewing easier. Sew on your cuffs pulling the stretchy (if you use the ribbed part of the sweater) fabric to be even with the not so stretchy part. Just keep it pulled tight between the pins so that it sews even, until you get to the end…don’t forget your reinforcement stitches at the ends.
Leg cuffs are on. I sewed using a straight stitch and then reinforced with a zig zag. Not sure if this is necessary with wool since it doesn’t fray, but I didn’t want to take my chances of anything coming apart and it worked out pretty well.
Pin on your waist band, and sew it onto the diaper cover. I later realized an even easier way to do this if you have a long piece of waist band. First you would sew up the one side of cuff and side of diaper cover, then you can sew one long piece of waistband to the diaper cover all around the waist band in one piece. and then just finish the second cuff/side. Either way it works, it’s easy, and it looks good.
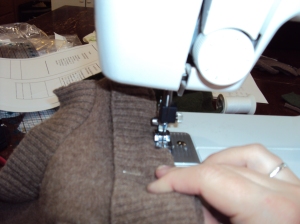
Make sure you stretch as you sew, when necessary.
Pin each side of the soaker, and sew from bottom of cuff to top of waistband.
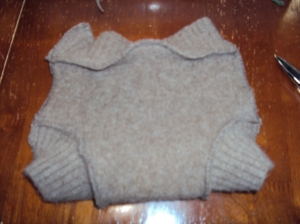
Inside out view of finished soaker.
Turn the soaker right side out and you are finished!
My finished products….It probably took me as long to do this tute as it did to sew the four regular soakers. (The longie took quite a bit longer because I had to keep piecing it together to make it work. And then of course those fishie appliques. And I bet it won’t even fit him till he’s about 9 months to a year.–Oh well, just in time for next winter.)
There was only one thing I didn’t really like about how I sewed these together, and that was that the leg cuff seams were located on the outer thigh rather than the inner thigh. You could do this differently so that the seam would be on the inner thigh and probably look a little better, but it just seemed like it would be too time consuming (making the pattern more difficult to sew) and really wasn’t that bad-looking. I then reasoned that if the seams were on the inside they would be more likely to irritate the baby’s legs than if they were on the outside, and that settled it for me. Easy, practical and they do look pretty good. Can’t wait to try them out!!!
Ooops, how did my baby belly get in the bottom of that picture? 😉
I hope you enjoyed my tutorial and I hope you find it useful in making your own diaper soakers. Thank you so much Katrina for your wonderful pattern. You can find Katrina’s pattern on her blog page at Katrina’s Sew Quick Soaker Pattern HERE. FYI, I did not use her longie patterns for my longie, If I had I’m sure I wouldn’t have had to peice it together. 😉 But if you want to do longies the right way, you’ll find Katrina’s longie patterns HERE.
In addition; you will also need to lanolize your soakers if you make them out of wool. This will enhance their ability to keep the wetness in and it keeps the wool in tip-top shape. I found a great tutorial by Understanding Laura over on Blogspot. I love the way she takes something that could be time consuming and difficult and makes it quick and easy, not to mention she’ll just make you smile. 😀
And last but not least, Zany Zebra has some other information on washing wool that might not be mentioned in the tute above. This includes information on how to wash wool in the sink or in the washing machine, and tips especially for those using unfelted wool and how to keep it that way.
Feel free to leave your questions, comments or suggestions below. I’d love to hear your ideas and even improvements. I’m sure I will be sewing several more of these in the near future. Happy Sewing!
DIY Cement Planters
I stumbled across this wonderful post by Centsational Girl on DIY Planters with plastic containers and even an instructable using a bowling ball. This inexpensive and creative project is a great way to beautify your home or garden this summer. With a few simple ingredients, a little bit of time, and your imagination; wa-la….gorgeous planters! Oh, and it’s a great way to reuse some old plastic containers too!
Oh! And did I mention that they’re also cheap!!? Yes they are! Reusing unwanted plastic containers this project could cost as little as $5.00, and that’s a huge savings considering the price of some concrete containers can be well into the hundreds of dollars.
You can find some good instructions here at GardenTrappings.


How to avoid the Swine (H1N1) flu and other colds and flu this season…without vaccines.
I have my own personal views about whether the H1N1 virus is really a “global epidemic” as they are saying, but we won’t go there today. It IS going around, just like the flu does every year, so it would be a good idea to avoid it. If we have the ability to avoid colds and flu without shots on our own, why don’t we? Considering that there is some speculation that getting regular flu shots can cause Alzheimer’s, and the fact that there are toxins in the flu shots such as aluminum, ethylene glycol, formaldehyde, phenol, and thimerosal (which contains mercury) should be enough to make us want to avoid the flu shot. In Washington state they have actually lifted the mercury limits which they allow in their flu vaccines, in order to give pregnant women and young children under three quicker access to the shots. So, for those of you who aren’t interested in getting vaccinated this year, here are a few great ways to minimize your chance of getting the flu and other contagious illnesses.
- Wash your hands frequently. Always wash your hands before eating or touching your face. Wash your hands or use hand sanitizer when you have visited public places such as the grocery store. I do not recommend anti-bacterial soap. Handwashing with soap and warm water while rubbing the hands and getting under the nails works best. Anti-bacterial soaps kill both good and bad bacteria, and they do not allow your body to build up immunity to bacteria that could make you sick. Building your natural immunity really is the best way to keep yourself healthy.
- Keep your hands off of your face as much as possible. These germs are spread through the mouth, eyes, and nose. Protect these portals of entry by keeping hands off of your face.
- Clean surfaces that are likely to have more hand contact, such as door knobs, phones, keyboards, counters, desks, remote controls, refrigerator handles, toilet flush handles, etc.
- Make sure you get enough sleep. 8 hours for the normal adult and 10-12 for children and teens.
- It is always wise to always have a healthy diet, exercise, and use stress management/stress relief techniques. During cold and flu season this will help to build your immune system up and help prevent illnesses.
- It is said that gargling with saltwater twice a day helps clean viruses out of the system before they have time to settle in and make you sick. It could be possible that gargling with saltwater has the same effect on a healthy person that Tamiflu has on an infected one.
- Vitamin supplements have been known to boost immunity. By optimizing your levels of vitamin C, zinc, and vitamin D3.
It seems many people these days are deficient in vitamin D3 (which is acquired through sun exposure) due to using sunblock and working indoors for longer hours. Taking at least 1000 IU of this one vitamin daily or getting at least 15 minutes of sun exposure to arms and legs daily (without sunblock) will help keep you healthy this flu season.
So save yourself the price of multiple doctors visits, prescription costs, flu shots and most importantly, save your self by making the best choices for your health. Always do your research, even after talking to a doctor, and make sure you are doing what is the best and healthiest for you and your family.
Note: I failed to post this during the flu season, but I had it written up and wanted to get it posted in advance for next flu season. By the way, Not I nor my family received any type of flu shots this year. Only my husband got sick.. The kids take a multi-vitamin plus 500 IU gummy D3 and I take a multi-vitamin plus 5000 IU D3. My husband does not take vitamins, but when he got sick I gave him 5000 IU D3 2x a day, and he got over it pretty quickly…and then there’s the outcome of the swine flu, the shots causing deaths and nervous system difficulties such as Gillian Barre Syndrome, and those I know who did get the ‘swine flu’ (if that’s what it really was, the doctors seemed to be calling everything swine flu for a time) are all just fine.
Homemade Castille Soap (Laundry Bar)
This recipe is used for making laundry detergent and for a laundry stain bar. The directions are for cold process soap in general. This is the process and safety tips I use and they work well for me. You may find more understandable instructions elsewhere on the web.
Clause: I am not responsible for any accidents or injuries resulting from the use of these soap making instructions. Make soap at your own risk. Please be careful and responsible.
RECIPE INGREDIENTS:
olive oil 14.4 oz
palm oil 1.6 oz
water 6.08 oz
lye 2.07 oz
SOAP MAKING DIRECTIONS (these instructions can be used for any cold processed soap making recipe);
Measure out all ingredients prior to making soap. You will need a small digital or manual postal type scale.
Heat oils in pan on stove to reach 110°.
Mix water and lye:
- NEVER use aluminum or metal container or utensils to mix lye. Use plastic or glass container and wooden or plastic utensil.
- NEVER add lye to hot water. Always use COLD water, the colder the better.
- NEVER ad water to lye, this can have “volcano-explosive” effects. Always add lye slowly to water while stirring gently (and ALWAYS mix in a well ventilated area or outdoors).
- ALWAYS keep a spray bottle of vinegar on hand. This can be used as a neutralizer for the lye in the event of burns.
Let lye mixture cool to 85°-95° (You may immerse the container 1/2 way into a cool ice water bath in the sink. Make sure you don’t get any of that water in the container and make sure the container is stable and will not tip or spill.)
Place pan of oils on a sturdy surface. Once lye has cooled to temperature, slowly pour lye/water mixture into soap mixture, while blending with an electric stick blender. (You can also stir by hand but it will take much, much longer. I have not personally done this so I can not tell you the time frame.)
Watch for “trace”. Trace is when the soap mixture thickens to a thin to medium pudding consistency and when you lift the blender and drizzle soap it will leave a “trace” of drizzle in the mixture. You will also notice the top getting shiny.
At this time you will add your pre-measured additives such as fragrance (or ground oatmeal etc. when making bath soap. NOTE: The above recipe is not for bath soap although it could be used as such but produces very little suds.)
When it reaches regular pudding consistency, it is done.
Pour into prepared, lined molds. I prefer large cigar boxes, or you can use any stiff cardboard box. I line them with freezer paper as if wrapping the inside of a present. It takes some practice but works quite well.
Place soap away from drafts and cold. Some prefer to wrap with a towel or small blanket. I just put mine in the oven with the light on. (no heat.)
Let ‘cure’ for 24-48 hours. Most soaps take only 24 but this soap may take longer. You want to make sure it is still soft enough to cut into bars but not so soft that it will be runny in the middle. If you can very easily put a finger indent in it, I would leave it sit a while longer.
Once set, remove from mold, and cut with large knife into equal size bars. (A good size for bath soap is 3 1/2″ x 2 1/4″ x 1″ or you can make round ones by pouring your mix into a cleaned out Pringles potato chip can, no lining necessary, when ready just peel off can and cut soap. For laundry soap I like to make them about 3″ x 1 1/2″ x 1 1/2″ which can be grated for laundry soap and also used as a stain stick (just spray water – or TKO cleaner- then rub on soap bar.)
Stand your cut bars on end on cardboard box or flat surface with space in between the bars. Keep in well ventilated area. This allows air to circulate and finish drying the soap. If necessary, label box with date and soap type. Turn soap over after a week or so. Let soap cure for about 2-4 weeks before using.
TIPS:
- make sure there are no lumps in your soap and that it is not grainy. if so, you may need to heat up the soap some to remedy this.
- Lye is a dangerous chemical and can burn your skin and eyes. Always wear rubber kitchen type gloves and goggles.
- When mixing lye, keep the room well ventilated or mix outside if possible. Fumes can be harmful.
- Do not make soap while toddlers and small children are close by. It is best to make soap during their nap times or when they are not at home.
- Again: Keep vinegar handy. Vinegar neutralizes lye.
- Again: Add lye to (cold- never hot) water, Never add water to lye.
Enjoy your soap! Your laundry! and the clean!
My (brain) Book
When I was pregnant with my daughter, I had this little green notebook that I picked up for about 50¢. On the cover I wrote “MY BRAIN” and used it to write down absolutely everything! Since we were purchasing our house, putting improvements on our land, a baby was coming, I had a lot of doctor appointments, I was still working outside of the home, and all sorts of various other things, I had to have something! (You know, “pregnancy brain”? Which never really went away, by the way.) Anyway, It worked for me. It was a mess but it was a small book so I knew if I just flipped through it, I would eventually find what I was looking for. I have never found a working “system” since.
A few weeks ago I found a great little notebook on Simply Vintage Girl’s blog that uses 4 x 6 notecards and craft rings. It’s quite a bit bigger than ‘the little green brain’ that I carried around those years ago. But now that I am home most of the time, It’s not something I need to carry around much anyway. I went ahead and made one for myself. Not quite as cute as hers, and I just used what I had around the house (except for buying a few packs of index cards). Now, I’m just like the Scarecrow on the Wizard of Oz! I have a brain! (and it’s even divided into sections for easy reference!)
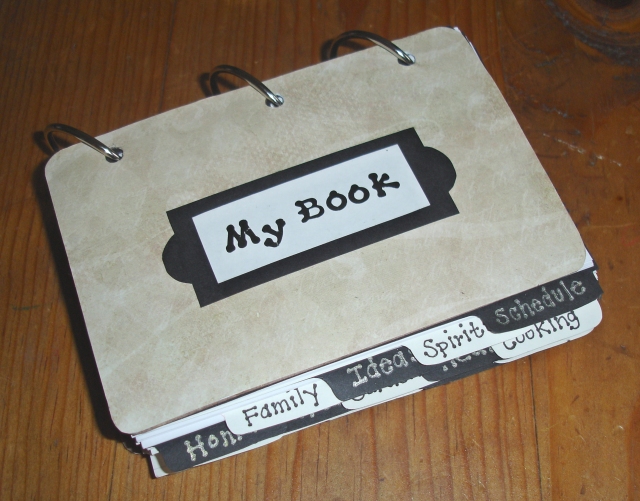
I made several tabs to try to keep more organized. I even left a few blank, just in case need more (and I am sure I will) because I forgot something.

Now all those great websites and crafty ideas, recipes and cooking tips, gardening plans and sewing ideas, that I find while browsing around the Internet will be forever stored in my (brain) book (until I remove them). With the pages being removable and replaceable, I should be able to use this book indefinitely…or until I wear it out. Awesome!!
Thanks Vintage Girl for you’re great idea on this one! You’ve helped me out a GREAT deal in (hopefully) finally getting it all together! (Is that really even possible?!?)
Scrimply Thrifty’s Homemade Cleaner Recipes
I found the greatest shower cleaner by accident. I make my own laundry
detergent and when I did, I spilled it over the top of the jugs, I set
them in the tub to cool and there was a “clean ring” where they were
sitting. So I put some in a spray bottle and sprayed the tub, let it
sit for about 5 or 10 minutes and then cleaned it with one of those
sponges with the netting on it (like you would use to clean bugs off
your car). Any textured sponge, scrunchie, or textured kitchen scrubber
type would work. It took very little elbow grease and my tub was shiny
clean when I was done! I was amazed, It works better than store bought
cleaners and is dirt cheap.
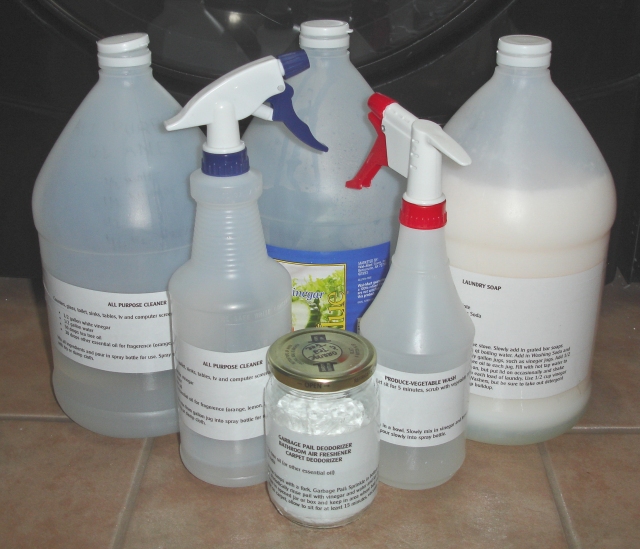
Trisha's Labeled Homemade Cleaners
Here is the recipe (this makes 4 jugs, you can cut the recipe to make
less to try it out:
TRISHA’S HOMEMADE LAUNDRY DETERGENT (and tub/shower cleaner)
1 bar of ivory soap (shred on cheese grater)
1 bar of fels naptha (shred on cheese grater) –recently used my homemade castille soap and it worked great!
2-4 cups washing soda (do not use baking soda)
1 1/2 – 3 cups borax (found in laundry aisle)
6 tbsp glycerin (supposed to infuse the oil into the mix so it doesn’t
settle on top and seems to make it thicker) this is optional.
2 Tbsp tea tree oil.
Boil 2 quarts water in large pan on the stove.
Reduce heat to just below boiling and add shredded bar soaps. Stir until soap is melted.
Add 2 more quarts boiling water, washing soda, and borax, mix well.
Pour it into a large bucket with a pour spout.
Add glycerin and tea tree oil. Stir.
Using a funnel (make sure it’s stirred good) pour equal amounts in each
bottle (4 – gallon jugs, vinegar or laundry detergent jugs work best,
milk jugs cant handle the boiling water)
Next, add hot water (doesn’t have to be boiling) to the jugs but
not full. Leave room for shaking.
Let cool and shake once or twice (or more) a day for a few days to keep
it from getting too gloppy.
Shake before using.
Soap may be a little gloppy or thick and it may separate. Make sure you shake well before every use. You may have to squeeze the jug a little for it to come out. The consistency has varied in different batches I have made. I do prefer it to be thicker, since I have a front load washer and I stays in one place so I can see how much I put in, but sometimes it does turn out sepearted and runny. I am still working on getting it to a good consistancy.
Add 1/4-1/2 cup per load of laundry, depending on how badly the clothes
are soiled.
Safe for use in HE washers. (This soap is not sudsy.)
Pour into spray bottle for use on tubs and sink to remove soap scum. If too thick, just add some hot water (up to half and half) before using. Shake well before each use.
Does not work on grease (kitchen use) Trust me, I tried! (but my other “All Purpose” cleaner does)
Use white vinegar in the rinse cycle for fabric softener.
TRISHA’S ALL PURPOSE CLEANER
1/2 gallon white vinegar
1/2 gallon water
30-50 drops of tea tree essential oil (about 3/4 tsp)
20-30 drops of other essential oil (lemon, orange, lavender, etc.) (about 1/2 tsp)
Fill gallon jug with 1/2 white vinegar and 1/2 water, add of tea tree oil (vinegar and tea tree oil are both disinfectants) and add other essential oils, for a more aromatic scent. You can add about 1/2 tsp liquid dish soap for added cleaning but it really isn’t necessary (or nessairly healthy). Pour into spray bottle. Spray on dirty surfaces and wipe clean. This disinfects, cleans grime and grease and shines. I use it just about everywhere, kitchen counters, sinks, stove (use a little baking soda and the spray for burnt on or difficult stove messes) I use it in the bathroom (not anymore in the tub, but I used to use it with some baking soda and it worked great but needed more elbow grease. Now I use the laundry soap on the tub for “better than Scrubbing Bubbles” clean.) I use it to clean the sink, toilet (inside and out) and mirrors. I use it to spot clean the floors. (some floors may not take kindly to vinegar, so please check first) I also spray trash cans or other odorous areas and let dry, it nearly (and sometimes completely) takes the smells away. I use it for dusting throughout the house as well, although I have no furniture that is sensitive (such as delicate wood or stain that might dislike vinegar/water. There is a vegetable or olive oil/lemon recipe that works much like a furniture polish but I just don’t use it, I’m just thankful it gets done the way it does.) and I’m not concerned about ‘shine’ as long as it’s clean and dust free. (If using for dusting, use with care.) This is the best all around cleaner I have ever used, it is so much cheaper and non-toxic to boot!
PRODUCE-VEGETABLE WASH
1 cup water
1 cup white vinegar
2 Tbsp baking soda
2 Tbsp lemon juice
Mix water and baking soda in a bowl. Very slowly, mix in vinegar and lemon juice. Wait until it is done fizzing and pour slowly into spray bottle.
Spray on fruits and vegetables. Let sit for 5 minutes. Scrub with vegetable brush and rinse.
GARBAGE PAIL DEODORIZER – BATHROOM AIR FRESHENER – CARPET DEODORIZER
½ to 1 tsp tea tree oil (and or other essential oil)
1 cup baking soda
Pour baking soda onto plate (paper works best) add in oil(s) by drops. Mix and work out all the lumps with a fork. Pour into a jar for storage.
TO USE:
Garbage Pail: Sprinkle in bottom of trash bag to keep fresh, or in bottom of pail before rinsing to absorb odors. Periodically rinse pail with vinegar and water and allow to dry in the sun.
Air Freshener: Store in opened jar or box and keep in area where odors occur.
Carpet: Sprinkle onto carpet, allow to sit for about 15 minutes, vacuum.
You can also use this in the washer in your laundry, add about 1/4 to 1/2 cup to the wash load for a fresh laundry boost. (no guarantee the scent will stick through wash and dry).
KITCHEN SINK DRAIN (UNCLOGGER) DEODORIZER
My mother in law loved this one! When the drains of your sink are getting a bit smelly, pour in 1/2 to 1 cup baking soda, making sure some of it goes down the drain, follow it with 1 to 1 1/2 cups of HOT white vinegar poured slowly over the baking soda so it fizzes and runs down the drain. (The vinegar can be heated in the microwave, be sure to wipe down your microwave afterward, since boiling vinegar in the microwave is the best way to clean your microwave.) Let sit without running water for as long as possible. at least 10-15 minutes. Run water and your drains will no longer be stinky.
Making these mixes/cleaners I save about $30-$35 a month on the basic cleaners, detergents and softeners!!! And probably a lot more on things you buy less often.
NEW COMMENT 5/22/09:
I have found a new cleaner called TKO, found at health food stores or online. It is made from the oil that comes from the orange rind. I bought and 8 oz bottle for $15 and that in itself seems kind of pricey but you use 1-2 oz to one gallon of water which still makes it much cheaper (and healthier) than buying one 30 oz spray bottle for this and one for that. This orange oil cleaner is 100% safe around kids and pets, if someone were to accidentally drink it, it would not hurt them. It even cleans off sharpie markers from many surfaces (if used undiluted). I use this for cleaning counters, tables, trash cans, sinks, furniture, windows, etc. The wonderful thing about it is the great orange citrus scent! It makes cleaning more fun by uplifting my mood. I still use the vinegar AP cleaner with baking soda for the stove and other tough jobs and of course the Laundry soap cleaner for the tub, but this works great for almost everything else.
Okay, now the BIG SECRET! I found this same stuff at my local feed store, under another name, in the organic gardening section. It was in a 1 liter (almost 34 oz.) bottle for about $20.00. It apparently repels pests as well. I haven’t bought this other brand yet because I still have 1/2 bottle of TKO but will let you know the brand when I do purchase some. P.S. It’s a good insect repellant as well and has many other uses and for that it would be best to give you the website rather than to list the many uses here. http://www.tkoorange.com/html/home_use.html. If you use another brand of this type of orange oil cleaner/pest repellant, please make sure it does not have any additional chemicals in it that could be harmful to your family or your pets.
